🔗 Hesabe Payment Integration
🚀 Integrating with Hesabe Payment Gateway
Complete Payment Integration Guide
This comprehensive guide will help you integrate your application or platform with Hesabe's Payment Gateway API, supporting multiple integration methods and advanced features.
🔄 Integration Types
Direct Integration
The merchant provides payment method selection (KNET, Visa/Master, American Express, Apple Pay, Google Pay) within their application interface, offering complete control over the payment flow and user experience.
✨ Features
- Complete control over payment forms
- Custom UI/UX design capabilities
- Higher level of customization
- Seamless brand integration
📋 Implementation Steps
- Create a payment form in your application
- Collect payment details securely
- Send payment request to Hesabe API
- Process the response
- Handle success/failure scenarios
Indirect Integration
Customers are redirected to Hesabe's secure payment gateway landing page where they can select their preferred payment method. This method offers quick implementation with automatic security handling.
✨ Features
- Quick and easy implementation
- Hesabe-hosted secure payment page
- Automatic security handling
- PCI DSS compliance built-in
📋 Implementation Steps
- Create payment request with parameters
- Redirect customer to Hesabe payment page
- Handle the response callback
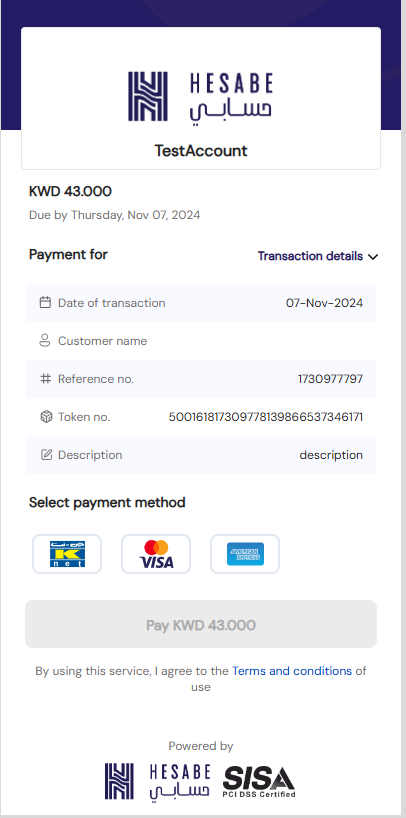
🖼️ Hesabe Payment Gateway Interface
The Hesabe Payment Gateway page provides a clean, user-friendly interface for customers to complete their transactions:
📤 Posting Payment Data
Secure Data Transmission
Payment data containing the required fields in encrypted form must be submitted to the 'Checkout' endpoint for initiating the payment request.
🌐 API Endpoints
📋 Request Parameters
🔄 Additional Parameters For Recurring / Subscription Method
Include these fields in checkout parameters when using recurring/subscription payment methods:
* These parameters are only used for KFast.
If you want to enable KFast, please contact your Account Manager or email support@hesabe.com.
# These parameters are only used for Tokenization using Cybersource & MPGS.
To enable this, please contact your Account Manager or email support@hesabe.com.
~ These parameters are only used for Authorization-only transactions using MPGS.
To enable this feature, contact your Account Manager or email support@hesabe.com.
Params - variable1, variable2, variable3, variable4, and variable5 can be used to pass arbitrary values (string only) in the form of key value pairs in the format "key__value".
For example, to pass Customer Name in variable1, you can pass "Customer Name__John Doe" as value of variable1.
These values would then be visible in the transaction details window of Merchant Panel and also be displayed in the email notifications.
The data is posted/passed to the HesabeRequestHandler that will concatenate and encrypt the data before invoking the Hesabe Checkout API endpoint.
1. Purchase / Sales
Payment Gateway Integration Steps
Follow these essential steps to integrate Hesabe Payment Gateway for purchase and sales transactions.
Sign up with Hesabe and get a Merchant Account created and approved through our onboarding process.
Login to the Merchant Panel using the credentials provided after registration.
Copy the Encryption Key from the Account section. Access Code & IV Key will be shared by Hesabe.
Configure Hesabe security keys in your application for secure communication.
Create payment form and deploy request/response handlers with integration kit guidance.
Create return pages for handling payment notifications on success or cancellation scenarios.
🔑 Access Hesabe Merchant Credentials
Required Security Credentials
To implement Hesabe payment gateway integration, you need the following security credentials obtained after merchant account activation.
📋 Required Credentials
Unique identifier for your merchant account
Authentication token for API requests
Encryption key for secure data transmission
Initialization vector for encryption algorithm
📍 How to Access Your Credentials
Access the Hesabe Merchant Panel using your account credentials
Go to the Account section in your merchant dashboard
Under Security Keys, find your Merchant ID, Access Code, and Secret Key. The IV Key will be shared separately upon account activation.
⚙️ HesabeRequestHandler
Request Processing Handler
The payment data posted via the checkout form is handled by HesabeRequestHandler. The posted data is validated and encrypted using the encryption keys from your Hesabe Merchant dashboard.
The following PHP Laravel code snippets demonstrate how the payment request process can be implemented:
$validator = $this->validate($request, [
    'merchantCode' => 'required',
    'amount' => 'required|numeric|between:0.200,100000|regex:/^\d+(\.\d{1,3})?$/',
    'paymentType' => 'required|in:0,1,2',
    'responseUrl' => 'required|url',
    'failureUrl' => 'required|url',
    'version' => 'required'
]);
Loading Encryption Keys, Access Code, And Api Urls From Config
$ivKey = HSB_IV_KEY;
$encryptionKey = HSB_ENCRYPTION_KEY;
$accessCode = HSB_ACCESS_CODE;
$checkoutApiUrl = HSB_CHECKOUT_API_URL;
$paymentUrl = HSB_PAYMENT_URL;
Json Encoding
After Validation, the request data is JSON encoded which is the array of the request keys & values.
$requestDataJson = json_encode($request->input());
Encrytion
This JSON data is then encrypted using AES algorithm with HesabeCrypt library.
$encryptedData = HesabeCrypt::encrypt($requestDataJson, $encryptionKey, $ivKey);
Invoking Hesabe Payment Api “CHECKOUT” ENDPOINT
The accessCode is initialized in the Request header and the Request data is posted to the Hesabe Payment Gateway Checkout API endpoint.
$baseUrl = "https://sandbox.hesabe.com";
$checkoutApiUrl = $baseUrl . "/checkout";
$checkoutRequestData = new Request([ 'data' => $encryptedData ]);
$checkoutRequest = Request::create($checkoutApiUrl, 'POST', $checkoutRequestData->all());
$checkoutRequest->headers->set('accessCode', $accessCode);
$checkoutRequest->headers->set('Accept', 'application/json');   // Only for JSON response
Reading Response
$checkoutResponse = Route::dispatch($checkoutRequest);
$checkoutResponseContent = $checkoutResponse->content();
Decrypting Response & JSON Decoding
$decryptedResponse = HesabeCrypto::decrypt($checkoutResponseContent, $encryptionKey, $ivKey);
$responseDataJson = json_decode($decryptedResponse);
Invoking Hesabe Payment URL
// $paymentUrl = {{baseUrl}}/payment
$responseToken = $responseDataJson->response->data;
return Redirect::to($paymentUrl . '?data='. $responseToken);
👤 Customer Details
To add customer details to the transaction, include the following parameters in the request:
🔗 Webhook URL Response
Real-time Transaction Updates
To receive transaction responses, add the webhookUrl parameter: Your page URL for receiving transaction updates. For more details, refer to the Webhook Integration.
🔒 2. Authorize / Capture
Two-Step Payment Process
The Authorize/Capture payment flow is a two-step process that allows merchants to authorize a transaction first (ensuring funds availability) and capture the funds later when ready to deliver the service or product.
Authorize and Capture features are only available with the MPGS payment gateway service.
🎯 Authorize Transaction Request
To authorize a transaction, include the following parameter in the checkout request:
Capture Transaction Request
To capture the authorized transaction, send a POST request with the following parameters:
Sample PHP Code:
$baseUrl = 'http://sandbox.hesabe.com/api/';
$captureApiUrl = $baseUrl . 'capture';
$requestData = [
    'merchantCode' => 842217,
    'amount' => 10,
    'paymentToken' => '84221717175011419773484853173'
];
$encryptedData = HesabeCrypto::encrypt($requestData, $encryptionKey, $ivKey);
$checkoutRequestData = new Request([
    'data' => $encryptedData
]);
$checkoutRequest = Request::create($captureApiUrl, 'POST', $checkoutRequestData->all());
$checkoutRequest->headers->set('accessCode', $accessCode);
Response Sample
{
    "status": true,
    "message": "Your refund request is waiting for approval",
    "data": {
        "token": "521042117249344539468767555844",
        "amount": "1.000",
        "order_reference_number": "1724934434",
        "transaction_status": "SUCCESSFUL",
        "refund_status": "PENDING",
        "payment_type": "KNET",
        "service_type": "Payment Gateway",
        "transaction_datetime": "2024-08-29 15:27:38",
        "refund_requested_at": "2024-09-04 15:04:44"
    }
}
Cancel Authorized Transaction
To cancel the Authorized transaction for further Capturing the Amount.
$baseUrl =  http://sandbox.hesebe.com/api/
$CancelApiUrl = {{$baseUrl}}/cancel/{paymentToken}
$checkoutRequest = Request::create($CaptureApiUrl, 'DELETE');
$checkoutRequest->headers->set('accessCode', $accessCode);
💳 3. Add Card / Merchant Initiated Transaction
Card Management & Recurring Payments
The Add Card and Merchant Initiated Transaction (MIT) processes are essential for businesses requiring recurring billing, subscriptions, or the ability to charge customers without direct input at the time of each transaction.
Add Card
To allow users to add their card in your app or website, create a checkout request with the following parameters and set the amount to zero.
🔄 Merchant Initiated Transaction
To initiate a merchant-triggered transaction using stored card credentials, create a checkout request using these parameters:
$baseUrl =  http://sandbox.hesebe.com/api/
$CaptureApiUrl = {{$baseUrl}}/subscription/capture
$requestData = [
"merchantCode" => 842217
"amount" => 10,
"paymentToken"=>84221717175011419773484853173,
"orderReferenceNumber"=>12365478989
];
$encryptedData = HesabeCrypto::encrypt($requestData, $encryptionKey, $ivKey)
$checkoutRequestData = new Request([
            'data' => $encryptedData
        ]);
$checkoutRequest = Request::create($CaptureApiUrl, 'POST', $checkoutRequestData->all());
$checkoutRequest->headers->set('accessCode', $accessCode);
Cancel Card
To cancel the Saved Card for further Transactions.
$baseUrl =  http://sandbox.hesebe.com/api/
$CancelApiUrl = {{$baseUrl}}/subscription/cancel/{paymentToken}
$checkoutRequest = Request::create($CaptureApiUrl, 'DELETE');
$checkoutRequest->headers->set('accessCode', $accessCode);
4. Refund
Transaction Refund Process
A refund is a transaction process where a merchant returns funds to a customer after a payment has been processed.
🔄 Create a Refund Request
To create a refund request for a transaction, pass the following parameters:
$baseUrl = 'http://sandbox.hesabe.com/api/';
$refundRequestApiUrl = $baseUrl . 'refund';
$data = [
    'merchantCode' => 'your_merchant_code',
    'token' => '521042117249344539468767555844',
    'refundAmount' => 1,
    'refundMethod' => 2,
];
$checkoutRequest = Request::create($refundRequestApiUrl, 'POST', $data);
$checkoutRequest->headers->set('accessCode', $accessCode);
Response Sample
{
    "status": true,
    "message": "Your refund request is waiting for approval",
    "data": {
        "token": "521042117249344539468767555844",
        "amount": "1.000",
        "order_reference_number": "1724934434",
        "transaction_status": "SUCCESSFUL",
        "refund_status": "PENDING",
        "payment_type": "KNET",
        "service_type": "Payment Gateway",
        "transaction_datetime": "2024-08-29 15:27:38",
        "refund_requested_at": "2024-09-04 15:04:44"
    }
}
🔍 5. Re-query
Transaction Status Enquiry
If you wish to enquire about a transaction status after completion, you can use the following API endpoint with the provided information.
📋 Request Parameters
| Field | Type | Description |
|---|---|---|
data | Alphanumeric | Data can be either Payment Transaction token or Order Reference Number (used in the request) to be passed in the URL. |
accessCode | String | Access Code provided by Hesabe to be passed in the Headers |
isOrderReference=1 in the body of the request.$baseUrl = "https://sandbox.hesabe.com";
$transactionApiUrl = $baseUrl . "/api/transaction/" . $data;
$transactionRequestData = new Request();
$transactionRequest = Request::create($transactionApiUrl, 'GET', $transactionRequestData->all());
$transactionRequest->headers->set('accessCode', $accessCode);
$transactionRequest->headers->set('Accept', 'application/json');
$transactionResponse = Route::dispatch($transactionRequest);
$transactionResponseContent = $transactionResponse->content();
Response Sample
{
    "status": true,
    "message": "Transaction found",
    "data": {
        "token": "521042117249344539468767555844",
        "amount": "45.000",
        "reference_number": "1724934434",
        "status": "SUCCESSFUL",
        "TransactionID": "424210001296274",
        "Id": 129179,
        "PaymentID": "100424210000015649",
        "Terminal": "144301",
        "TrackID": "25119",
        "payment_type": "KNET",
        "service_type": "Payment Gateway",
        "customerName": "User Name",
        "customerEmail": "user@gmail.com",
        "customerMobile": "98726012",
        "customerCardType": null,
        "customerCard": null,
        "datetime": "2024-08-29 15:27:38"
    },
    "results": [
        {
            "token": "521042117249344539468767555844",
            "amount": "45.000",
            "reference_number": "1724934434",
            "status": "SUCCESSFUL",
            "TransactionID": "424210001296274",
            "Id": 129179,
            "PaymentID": "100424210000015649",
            "Terminal": "144301",
            "TrackID": "25119",
            "payment_type": "KNET",
            "service_type": "Payment Gateway",
            "customerName": "User Name",
            "customerEmail": "user@gmail.com",
            "customerMobile": "98726012",
            "customerCardType": null,
            "customerCard": null,
            "datetime": "2024-08-29 15:27:38"
        }
    ]
}
🌐 Common REST API Status Codes
These widely used HTTP status codes are relevant to REST API operations and represent standard responses from the server regarding the outcome of HTTP requests.
| Status Code | Description |
|---|---|
| 200 | OK – The request has succeeded. Used for successful GET or POST responses. |
| 201 | Created – The request has succeeded, and a new resource has been created. Common in POST requests that create data. |
| 204 | No Content – The server successfully processed the request, but there is no content to send in response. |
| 400 | Bad Request – The server could not understand the request due to an invalid syntax. Often used when required fields are missing. |
| 401 | Unauthorized – Authentication is required and has failed or has not yet been provided. |
| 403 | Forbidden – The server understands the request but refuses to authorize it. |
| 404 | Not Found – The requested resource could not be found on the server. |
| 405 | Method Not Allowed – The request method is known by the server but has been disabled for the requested resource. |
| 408 | Request Timeout – The server timed out waiting for the request. |
| 409 | Conflict – The request conflicts with the current state of the resource. |
| 415 | Unsupported Media Type – The media format of the requested data is not supported by the server. |
| 429 | Too Many Requests – The user has sent too many requests in a given amount of time (rate limiting). |
| 500 | Internal Server Error – A generic error message, given when an unexpected condition is encountered. |
| 502 | Bad Gateway – The server was acting as a gateway or proxy and received an invalid response from the upstream server. |
| 503 | Service Unavailable – The server is not ready to handle the request, often due to maintenance or overload. |
⚠️ Custom Application Error Codes
Application-specific error codes used to identify and describe issues related to merchant transactions, authentication, authorization, and payment processing. Each code corresponds to a unique system error or validation failure.
| Error Code | Description |
|---|---|
| 422 | The input data provided is either invalid or incomplete. |
| 501 | The specified merchant is not recognized or registered. |
| 503 | The merchant does not have access to the requested service. |
| 504 | Incorrect login credentials provided by the merchant. |
| 505 | The payment token is invalid or has expired. |
| 506 | The request contains data that is not formatted or structured correctly. |
| 507 | A generic error occurred during the transaction process. |
| 508 | The transaction amount exceeds the allowed limit. |
| 509 | The number of transactions for the day exceeds the permitted limit. |
| 510 | The total transaction amount for the day has been exceeded. |
| 511 | The number of transactions for the month exceeds the permitted limit. |
| 512 | A threshold has been reached, but the transaction can still proceed. |
| 513 | The session has expired due to inactivity. |
| 514 | The amount captured is less than what was originally authorized. |
| 515 | The captured amount exceeds the authorized amount. |
| 516 | The captured amount is more than the available authorized balance. |
| 517 | The authorization has expired and is no longer valid. |
| 518 | Authorization must be enabled before proceeding with this transaction. |
| 519 | The currency used in the transaction is not supported or invalid. |
| 520 | The transaction was cancelled by the user or system. |
| 521 | This transaction has already been captured and cannot be captured again. |
| 522 | Terminal ID is missing from the request or is invalid. |
| 523 | The account details provided are incorrect or incomplete. |
| 524 | The KNET card used is not valid or unsupported. |
| 525 | The commission structure provided is invalid or does not match the expected format. |